Disclosure: This post may contain affiliate links from which I earn a commission.
Wall gardens
Video demonstrating the vertical wall garden and shovel art installation.
I have a passionate love affair with wall gardens – mostly because they are the sexiest idea for a garden I have heard of in a long time. They enable city gardeners to garden vertically to save space and suburban gardeners to bring unique interest to their yards and gardens. All the way around, vertical gardening is a good choice and I have wanted one as long as I can remember. This year I finally built one with a Wally system from Woolly Pocket.
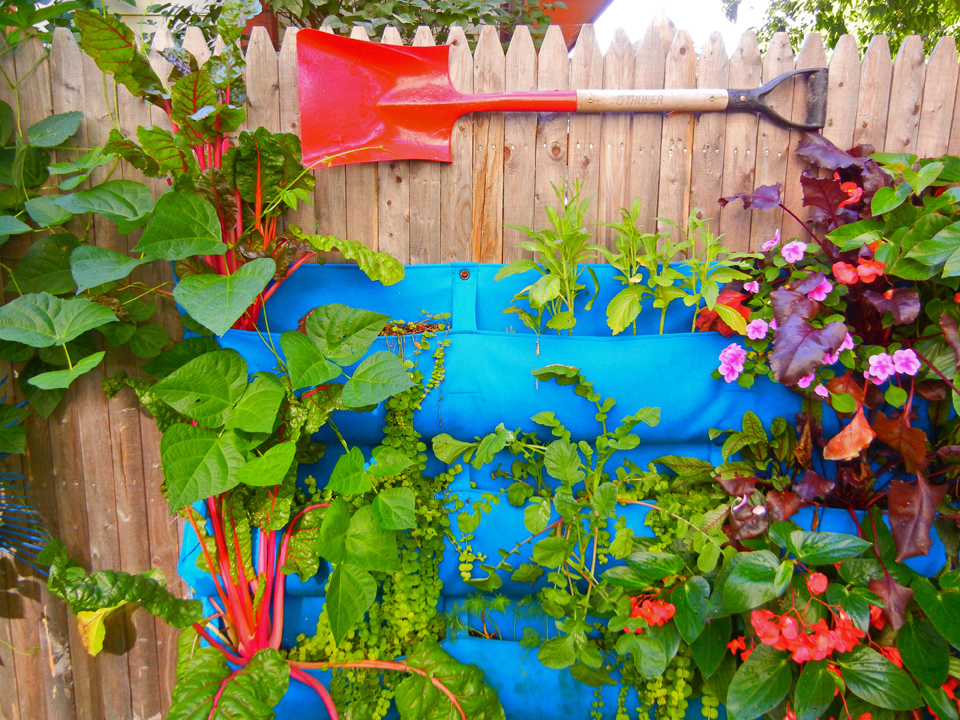
Wally’s are awesome. They are made in the USA by Woolly Pocket from 100% recycled plastic water bottles. Pockets feel soft like felt and are breathable, modular, and fun! While some would prefer a thick vegetative look, I wanted to keep it lighter and artsy with a lot of bright color on the display wall which features painted shovels and the amazing Peacock Blue Wally’s.
How To Install A Wally System:
What you will need: The Wally System comes complete with universal fasteners and wall anchors. All you will need is a drill. I also used an industrial size stapler to pre-hang the pockets.
Step 1 – Line the Wally’s up and overlap their grommets; grommet to grommet horizontally measures 22 inches across. When you hang them vertically space them 13 inches up and down – grommet to grommet. Wally’s come in 3 lengths; I used the Wally 5, which is 112 inches wide. To make it easier, I stapled them to the fence before I did any screwing, making sure I had the pockets at the right location on the fence.
Step 2 – Screw in the pockets with the drill. Finished photo above.
Step 3 – Add soil to an inch short of the top of each pocket. I chose Organic Mechanics Potting Soil as it is a good choice to grow vegetables organically.
Step 4 – Plant seeds and/or plants.
Spring Planting – Initially I started with lettuces and spring greens as you can see in the below plan. One of my helpers, Cathy DeMarchi, designed the layout of the Spring garden and did a fabulous job. So you can better read the plan, I turned it on its side – the top squares represent the left hand side of the wally.
Below is a photo of the full grown Spring garden overflowing with lettuces.
Summer Planting – The spring lettuces and pak choi soon became leggy and lanky (as seen above), so we replaced the spring planting with a draping perennial groundcover; Creeping Jenny. The vegetable seeds continue to grow and as you can see in the top photo, have been filling out nicely through mid-summer.
This was an easy and fun project which was also green and sustainable. LOVE IT! Special thanks to Cruz Guttierez and Katie Szekely for helping me install the shovels. Thanks to Cathi DeMarchi and Josette Cook for helping design and plant the wall.
*Note – Because the FTC requires it, I am noting that Woolly Pockets sponsored the three Woolly wall displays and Organic Mechanics Soil sponsored the soil used for this project. Burpee Home Gardens supplied the vegetable plants grown in the garden this season. Botanical Interests supplied the seeds. I write many instructional stories and videos with these incredible products and donate a large portion of the vegetables to the local food pantry when harvested.
how heavy is it? I imagine the fence takes quite a beating from the weight, no?
Each plant pocket weighs about 20 lbs after planting. My fence is holding up fine with no issues, so I think all will be great over time.
Shawna
Looks amazing! Great video!
I think this is a great way to grow veggies for someone like me who has limited sun and space.
PS Love the hostas:)
Glad you like the hostas. 🙂
Shawna
I like that you allowed the peacock color to be part of your scheme, and I love the colorful tools! Myself, I would only plant Flowers in this wall space, as I really avoid ingesting plastics wheneve I can. I don't think we could do Organic Gardening this way, but it brings a fantastic structure to the space. 🙂
I love you blue Woolly Pockets and the way you've displayed them!


 modular, and fun! While some would prefer a thick vegetative look, I wanted to keep it lighter and artsy with a lot of bright color on the display wall which features painted shovels and the amazing Peacock Blue Wally’s.
 Step 2 – Screw in the pockets with the drill. Finished photo above.


how heavy is it? I imagine the fence takes quite a beating from the weight, no?
Each plant pocket weighs about 20 lbs after planting. My fence is holding up fine with no issues, so I think all will be great over time.
Shawna
Looks amazing! Great video!
I think this is a great way to grow veggies for someone like me who has limited sun and space.
PS Love the hostas:)
Glad you like the hostas. 🙂
Shawna
I like that you allowed the peacock color to be part of your scheme, and I love the colorful tools! Myself, I would only plant Flowers in this wall space, as I really avoid ingesting plastics wheneve I can. I don't think we could do Organic Gardening this way, but it brings a fantastic structure to the space. 🙂
I love you blue Woolly Pockets and the way you've displayed them!
Thank you!! 🙂