Build an Art Gallery Side Yard Garden
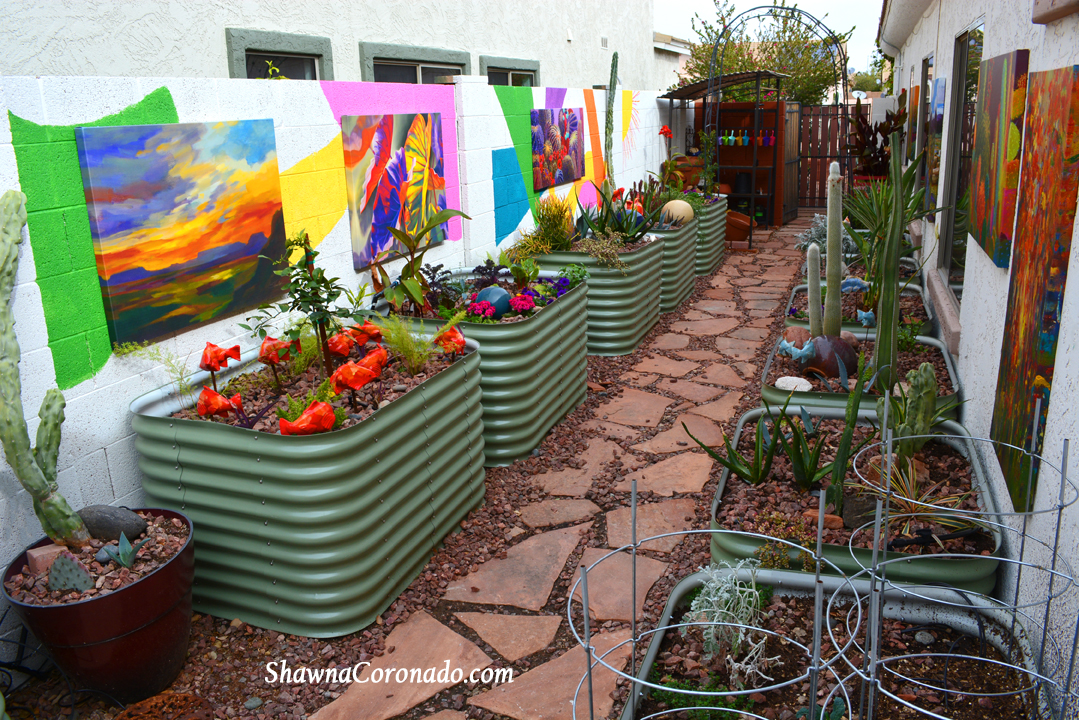
An art gallery side yard garden with raised garden beds? Yes, please! Side yards and other out of the way outdoor niches can be a challenge to design and grow. Yet, imagine your side yard or dark corner brightened up with an art gallery? Building a creative, inspiring, colorful art gallery wellness garden in your little niche might just be the way to influence your friends and family to get outdoors and discover their wellness and health.
Read on for detailed tips on how you might choose colors and materials to create an art gallery garden for your home or community.
Good Products I Used for Building My Creative Art Gallery Side Yard Garden —
- Birdies Raised Beds – Coated galvanized steel with a powder-coated food-safe, non-toxic paint for a beautiful, long-lasting result. Discount 5% off any garden bed product with the “SHAWNA5” Discount Code!
- Garden Grid™Watering System – Easy pre-assembled system, just drop in and connect to irrigation lines. Get $10 off any Garden Grid™ Watering Systems order of $100+ with the “SHAWNA10” Code!
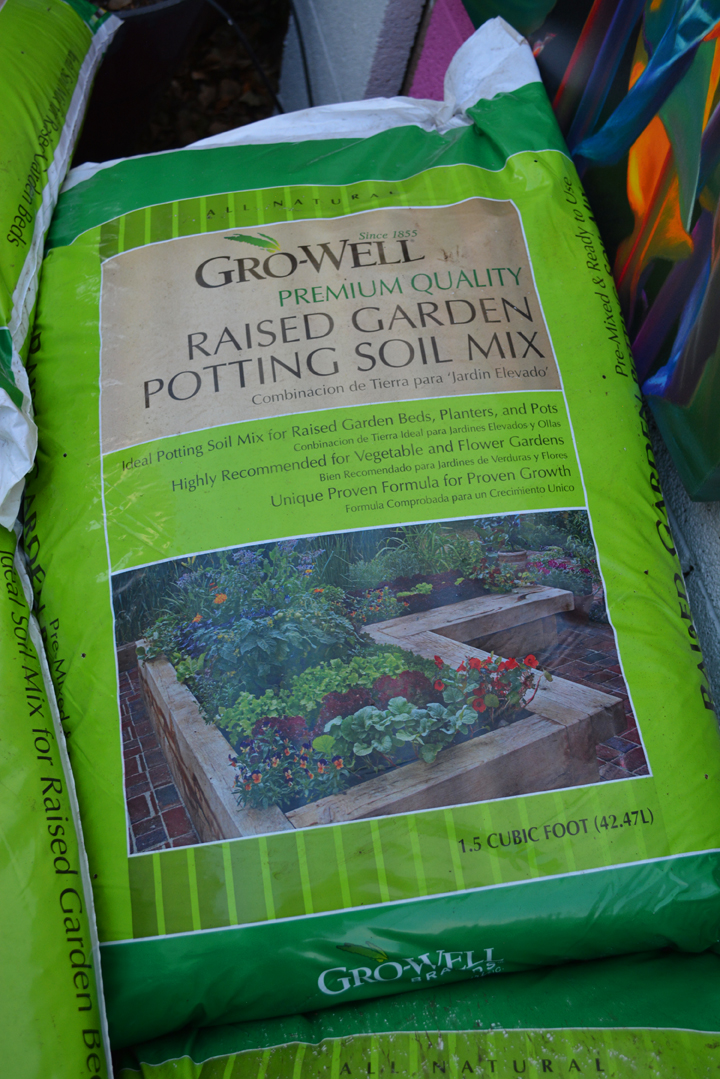
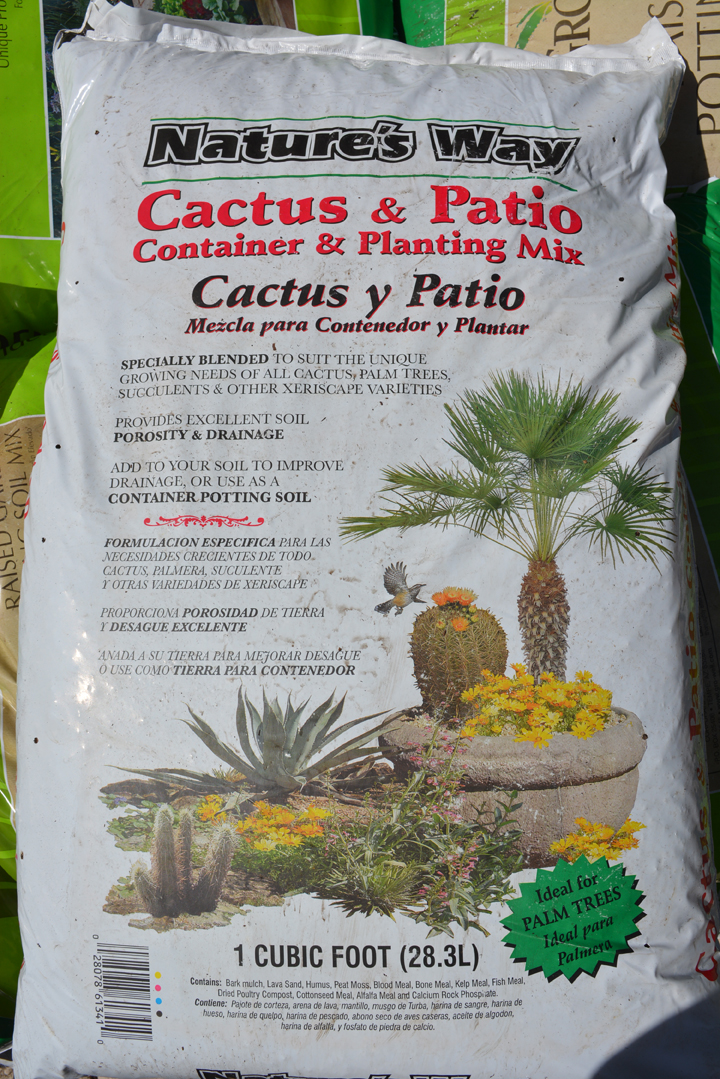
- Gro-Well Raised Bed Soil and Nature’s Way Cactus & Patio Mix Soil – Ask for this soil at your local garden center.
- Midtown Swilt Umbrellas – The Swilt 8 foot Terylast terracotta automatic tilt umbrellas with strong fiberglass ribs to resist wind.
- Fish in the Garden Sculptures – Ceramic garden fish with special metal fish stands which help the fish float above your garden. An easy 5% off any garden bed product with the “SHAWNA5” Discount Code!

What Materials and Art Works for an Outdoor Art Gallery?
When creating an art gallery side yard garden, it is important to have an understanding of what type of art works outdoors. In my experience, the goal is to find items that are as weather-proof as possible. I live in Arizona, where the heat is blaring, the monsoons are drowning, and dry rot from the sun is a common concern. The art items I’m using could have also survived my time in a Chicagoland garden with cold winters and lots of wet.
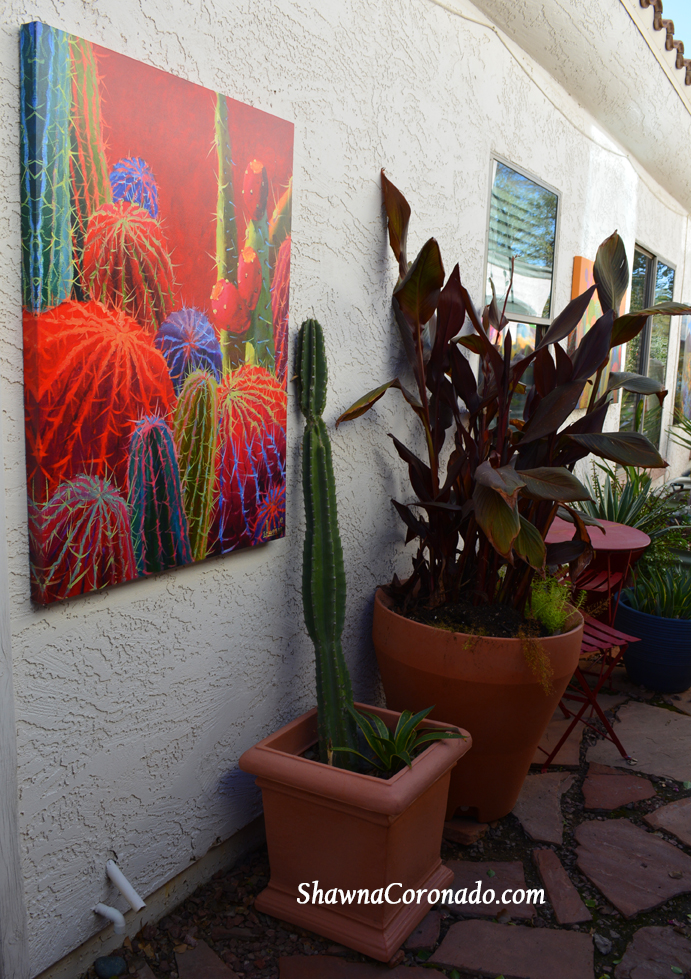
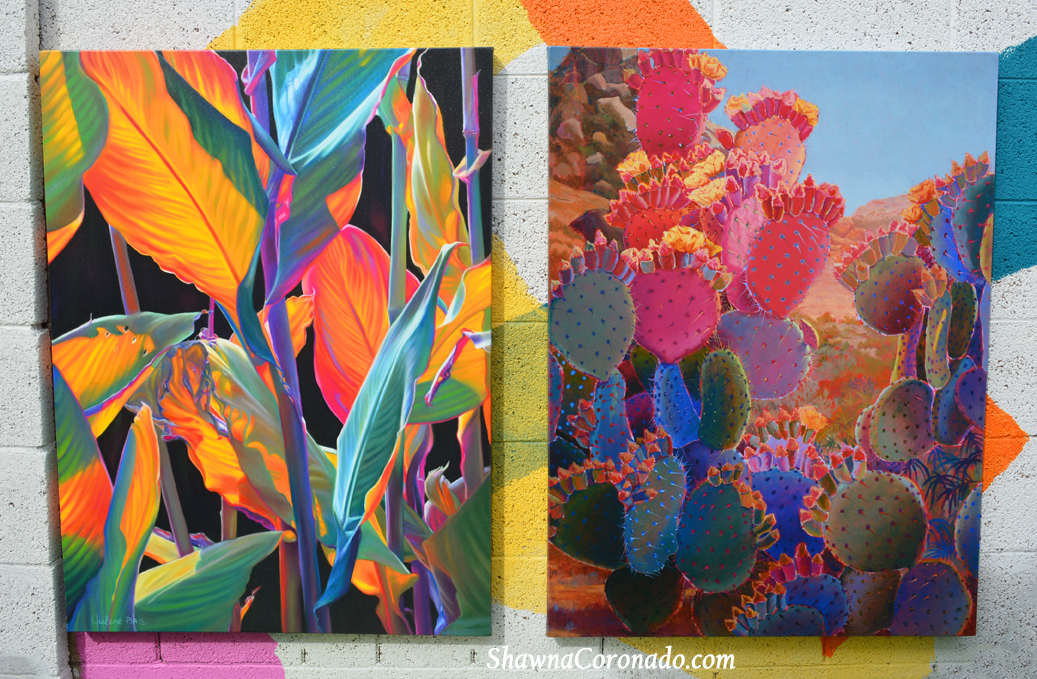
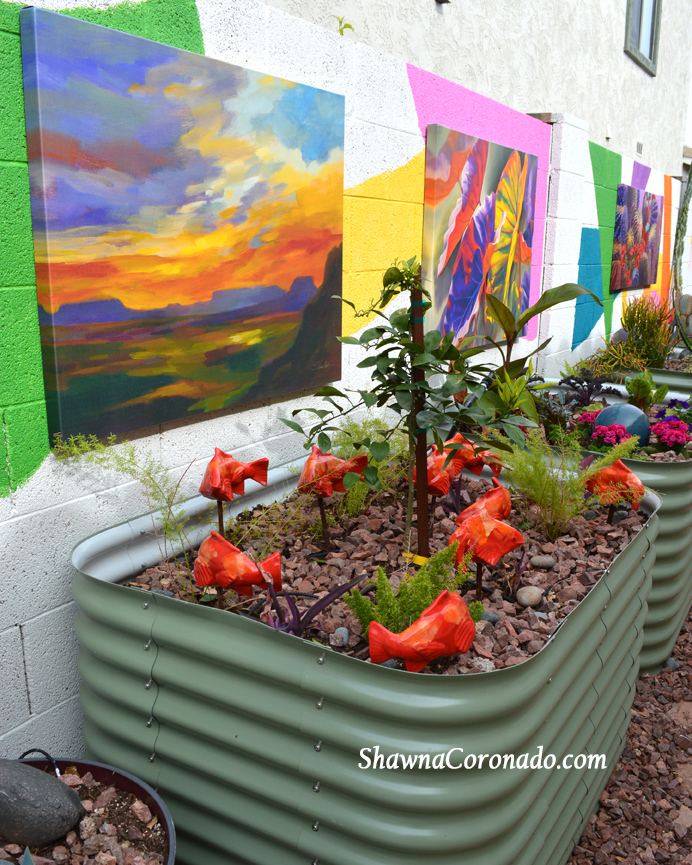
Durability is the #1 goal. My favorite durable art gallery items for these extreme conditions in my gardens are the outdoor all weather canvas art hanging on the walls – I no longer promote them because I have found that they are sometimes difficult to obtain in a timely fashion – and the sculptural Fish in the Garden by Tyson Weiss (see in the photo below right).
List of Durable Outdoor Art Materials that Survive Summer and Winter Conditions
- Waterproof ceramic, glass, polyethylene, or terracotta containers and statues
- Metal elevated beds or containers and metal art that has been cast, recycled, or pre-shaped form
- Stone sculptures, rock, seashells or driftwood
The list of art materials is endless, but I’d stick with items you know will stand the test of time in extreme conditions (snow/cold and sun/heat). Durable materials are best because they last the longest. Always be concerned about safety and use items that will not harm you or the environment.
Should Plastic Touch Garden Soil?
While plastic sculpture and containers can be fine to use for a few years, I have found that plastic sometimes fades in color or breaks apart with heavy duty use in both extreme cold and extreme heat situations. Plastics can have BPA and other toxicity issues as well. Therefore, make sure that all plastic pieces you get are protected from UV light or are guaranteed by the manufacturer as strong outdoor use items. Most importantly, make sure the items you use in your garden that specifically touch soil and grow with the plants are food safe at every opportunity.
How to Choose Color in Garden Design
Lots of people have color opinions. I once saw two garden professional nearly come to blows over martinis while discussing garden design colors. Why? Because it is like your favorite coffee set up; every one has their own way of combining sugar (or not) or adding cream (or not). This is true of color theory as well. We all have our favorite combinations, so the rule I prefer is not to sweat the details and simply choose the colors that make you feel the best.
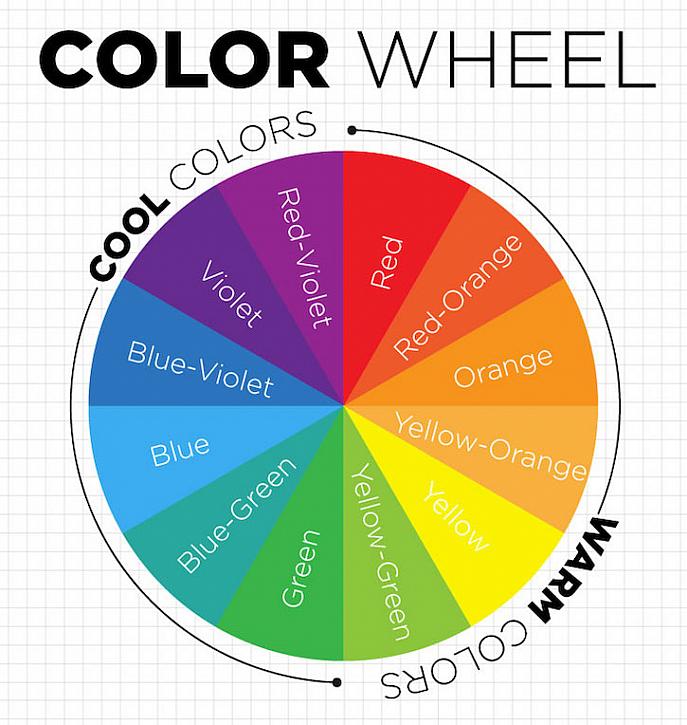
Color Wheels Help Visualization
Start with a color wheel. Above you can see a very basic color wheel which shows you where warm colors and cool colors are in relationship to one another. For a more matching color experience you might choose colors on the same side of the wheel. They meld together harmoniously. For a more exciting color experience you might choose colors that are opposite one another. Opposite colors contrast. Use the color wheel to help guide you in your decisions.
The Color Rule that Works
Follow rules such as limiting the number of colors, avoiding black, or only use pale colors on the exterior of your home? The shocking truth – the rule is that you should break all the color rules and do what you like. This is your home and your garden. You have total control to try new things with color and sometimes break all the traditional color rules.
What I do in My Garden with Color
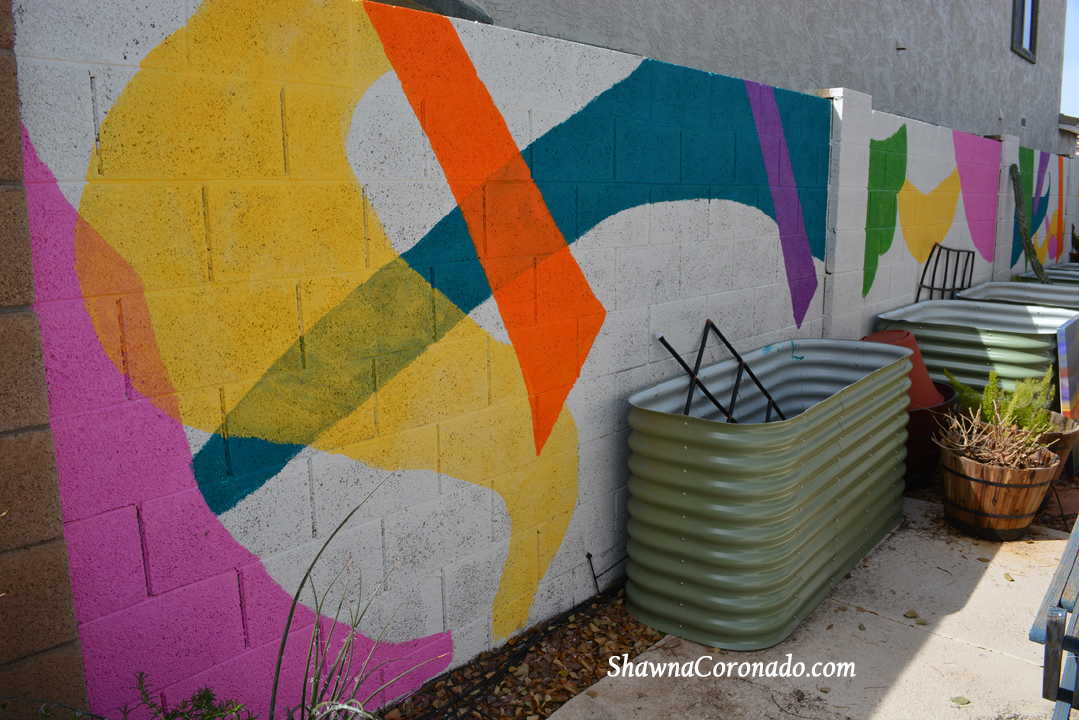
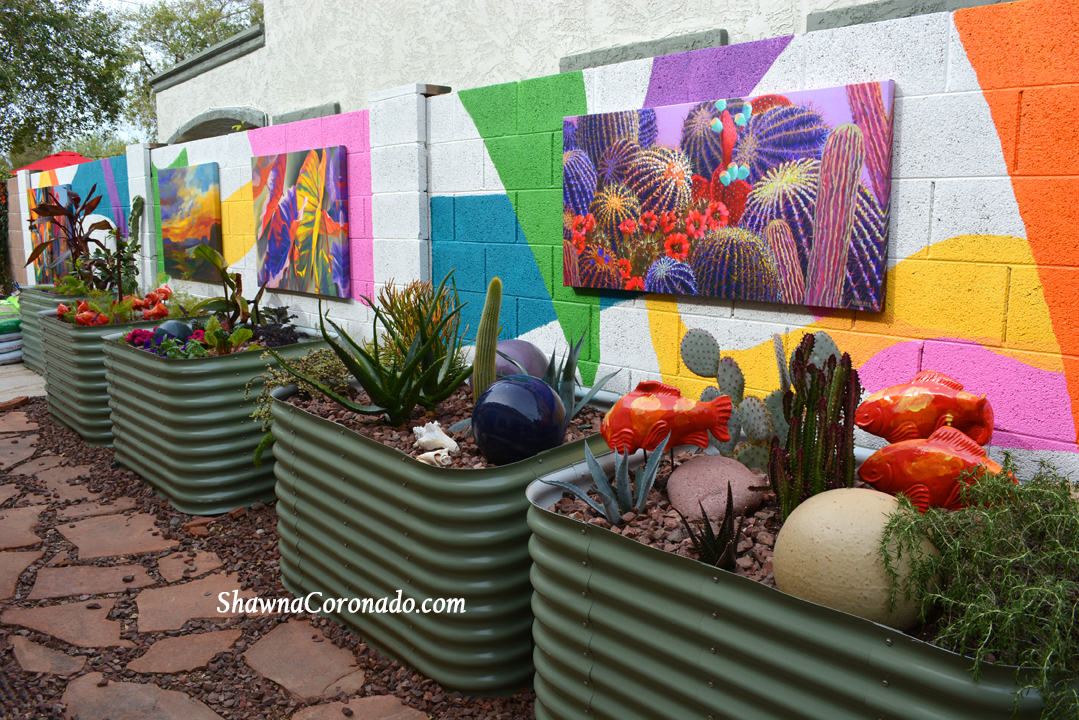
In my home here in Arizona, my primary decorative colors are terracotta orange and cactus green, with a strong mix of contrasting blue and purple dropped in here and there. I took that indoor theme and brought it outdoors to the side yard.
Bring Color Outdoors
Feature colors in my garden are orange and green. You can see terracotta orange rocks, umbrellas, and walkway. The deep orange is set off by green elevated garden beds. The art I’ve installed brings in these colors then has pops of purple, blue, and yellow. At first glance you don’t notice the “color theme”, but as you look closer, you can see patterns emerge.
The point is you should live with what you prefer and not rigid color rules. In my opinion it is whatever your heart desires. Find the colors that bring you the most joy and play them up in the art gallery garden. I love BOLD color!
Steps to Build an Art Gallery Side Yard Garden
Below is a list of steps I used to create the art gallery side yard garden. It tells you what went into the build and how you might accomplish something similar. At the bottom of these steps you will see a full photo gallery showing the process.
1 – Measure Your Space
Any garden design is dependent upon the square footage and the space you have available. You might, for instance, only have space for one or two paintings on the wall. Perhaps you have a tiny area that will only allow one elevated bed container. Measure your garden space and draw out a basic idea on a scrap of paper (or on the computer if you’re digitally advanced).
SPECIAL NOTE: My side yard garden has irrigation lines running beneath the ground, so I measured with consideration of where irrigation might influence the position of a container.
2 – List Your Goals
Once you understand how much space you have available, it is time to prioritize your goals. How will you be using this specific space? As an outdoor cooking area or herb garden? A walkway or outdoor room? Maybe you want a seating area and a reading nook? What type of art do you want in the garden? Now you know what you would like to do and how much space you have to do it. Decide what plants will work best in the area and what your growing goals might be.
3 – Get Your Materials
If you have all the materials you’ll need, then great. If not, you will need to get paint, brushes, planters, irrigation, tools, soil, and art pieces. Based on your measurements, determine what beds and other garden items you can fit in the garden.
While you will surely have an idea about what plants to grow in this garden, start with the hardscaping materials. Complete this part of the project first then add in the plants at the very end.
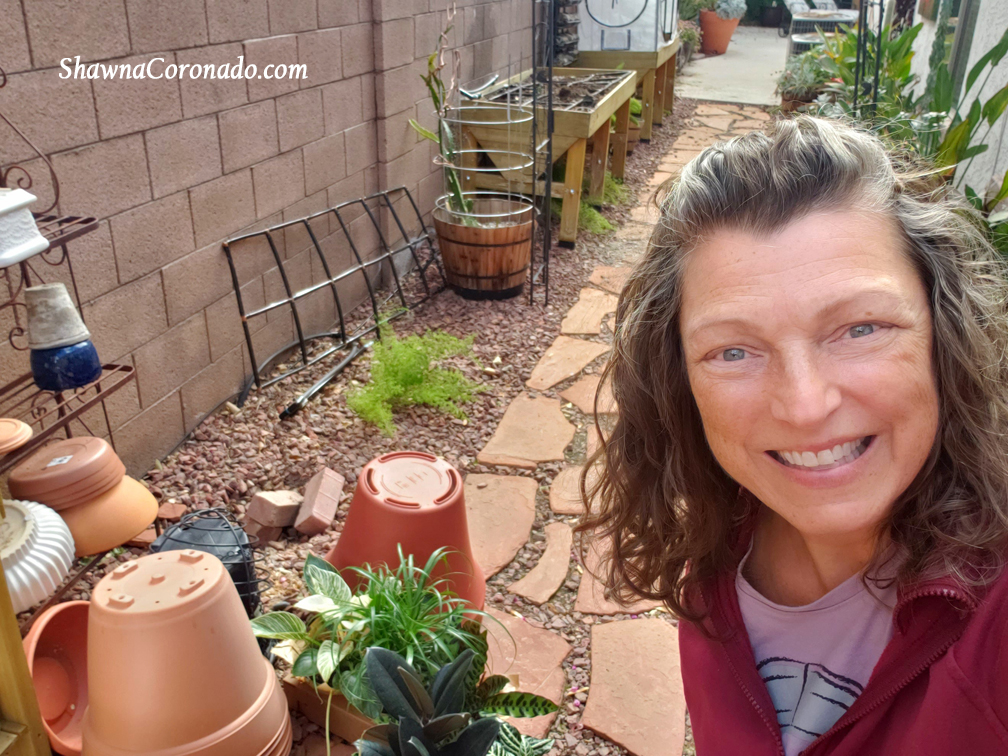
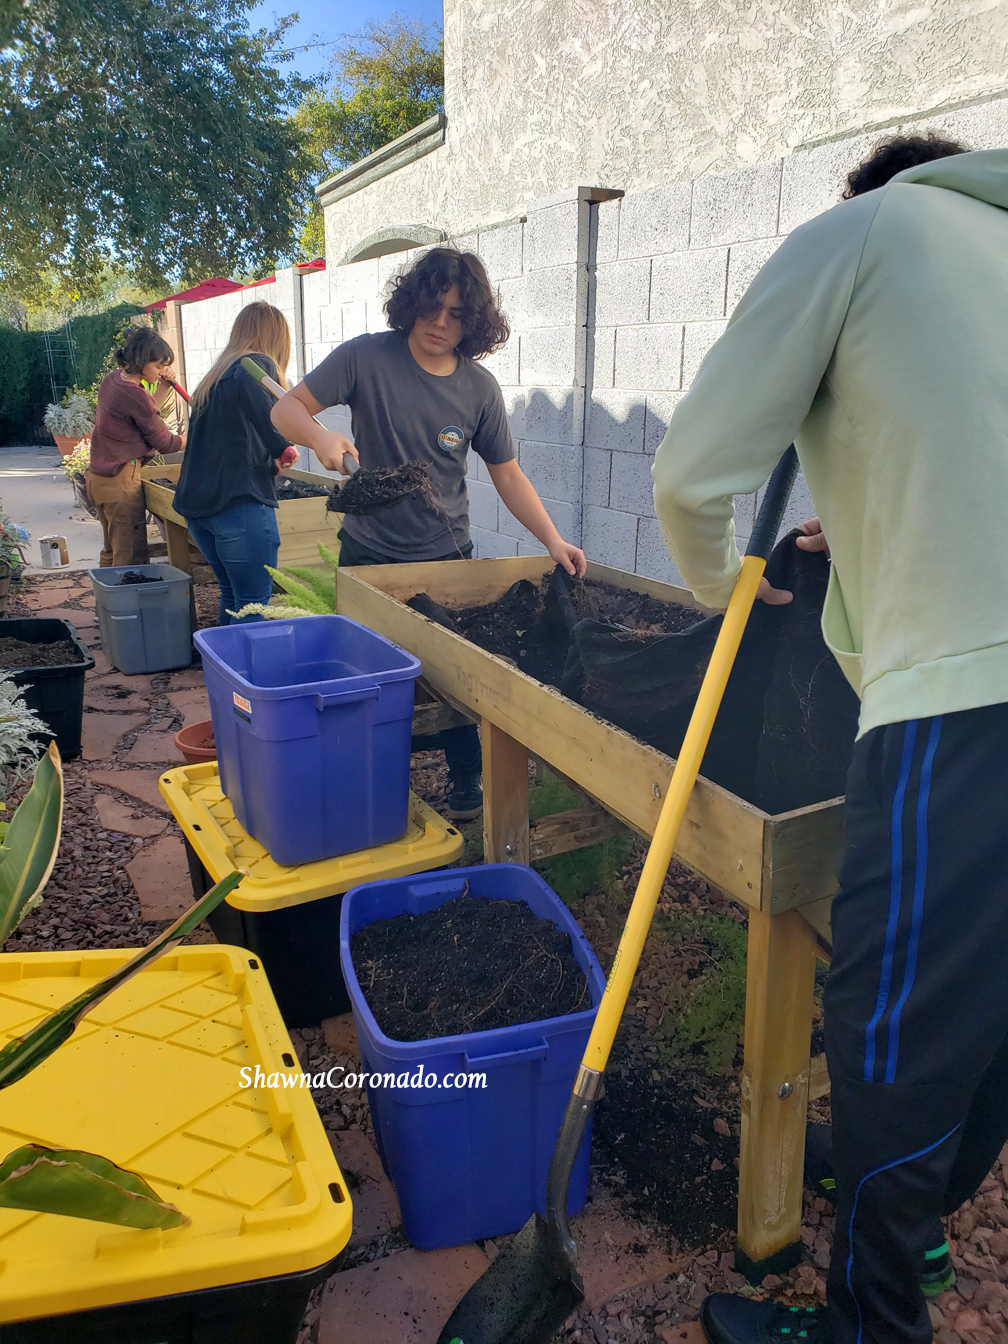
4 – Clean Up the Garden
Cleaning out the old garden is the most tedious part of this project. Get it done with help from your neighbors. Mine helped me and I donated my previous garden beds to the neighborhood so that others can garden.
5 – Paint the Walls or Fences
Prime your walls or fences with primer. Follow with the colors you choose, either one solid color, or a mural like I have done on my masonry fence.
The secret is to find paint which is built specifically for the material you are painting on. Let the paint dry before moving on to the next step.
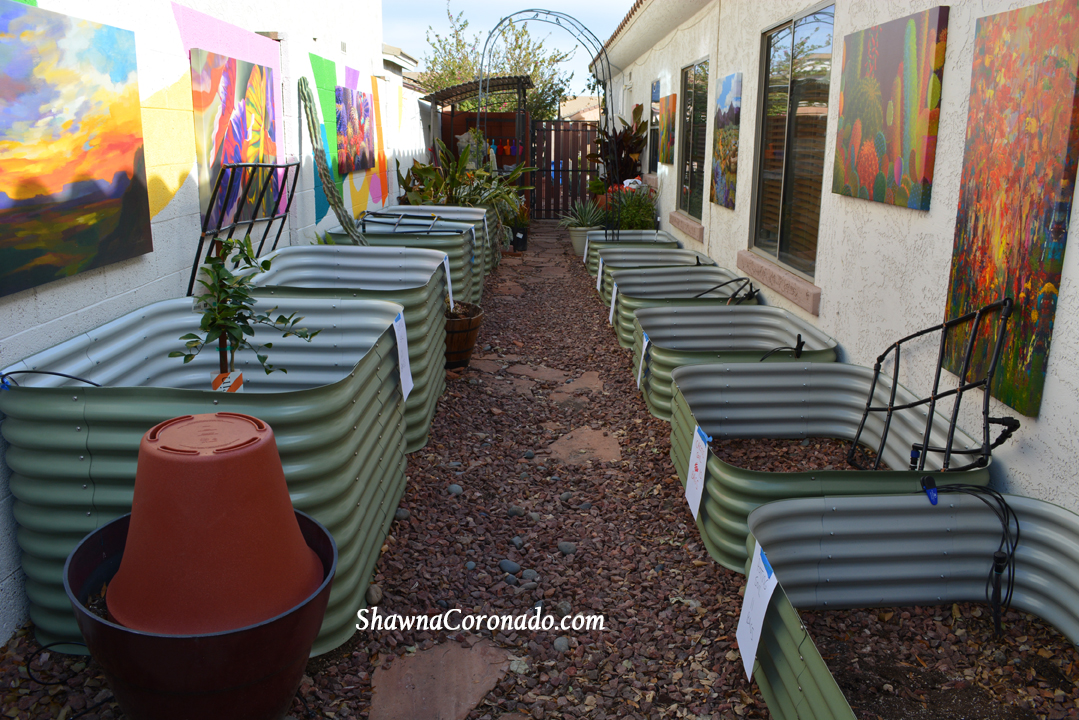
6 – Place Garden Containers in Place
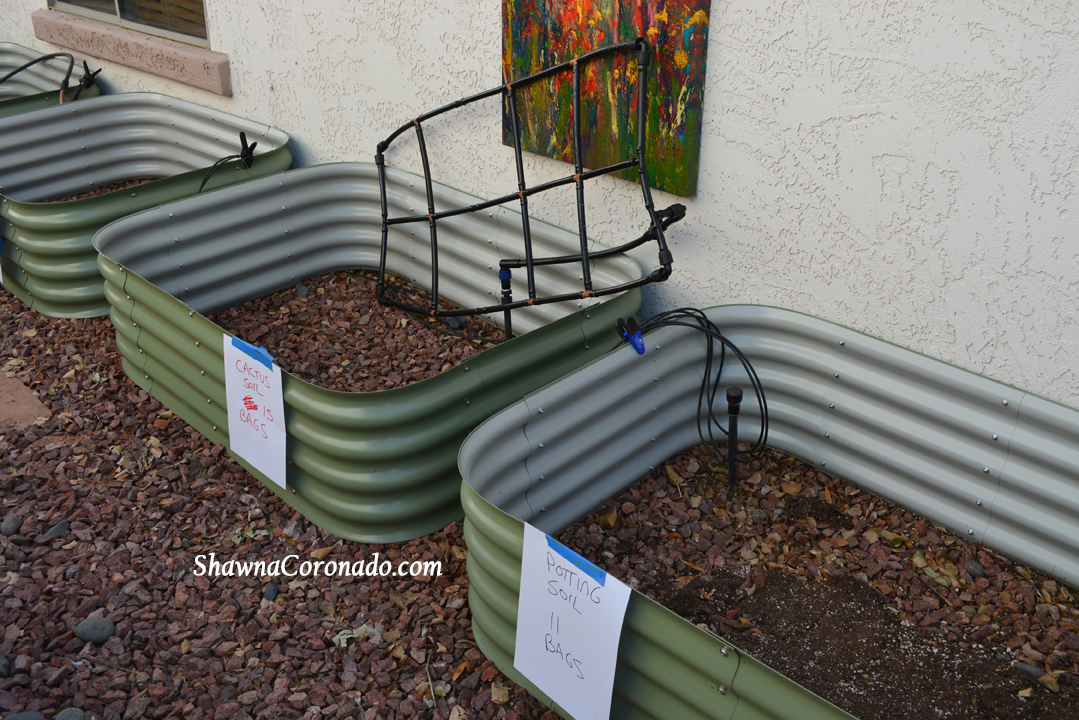
Whether you build the containers from a kit for your art gallery side yard garden like I have done with the Birdies Raised Beds or use pre-built garden containers, it is important to place them in position before you fill them with soil.
7 – Plan Irrigation for the Garden
Decide on where your irrigation lines should be placed. If you have a built-in irrigation system like I do, all you will have to do is run smaller lines from the main irrigation system. If you do not have an irrigation system, you can easily plug in the Garden Grid™Watering System I use. Just plug it to your garden hose and turn on the water utilizing a timer.
8 – Hang Wall Art
Trying to hang wall art once the containers are all filled with soil can be difficult. It is much easier to hang wall art before the containers are filled. We used concrete drill bits in order to drill the holes to place the appropriate hangers in the cement block walls. What you use will depend on the structure of your walls. You can get the outdoor wall art on my website.
9 – Fill Containers with Soil
There are many techniques for filling large elevated beds. I used either cactus soil or elevated bed container soil in the Birdies Bed containers. Once the beds are filled with soil, it’s time to plant.
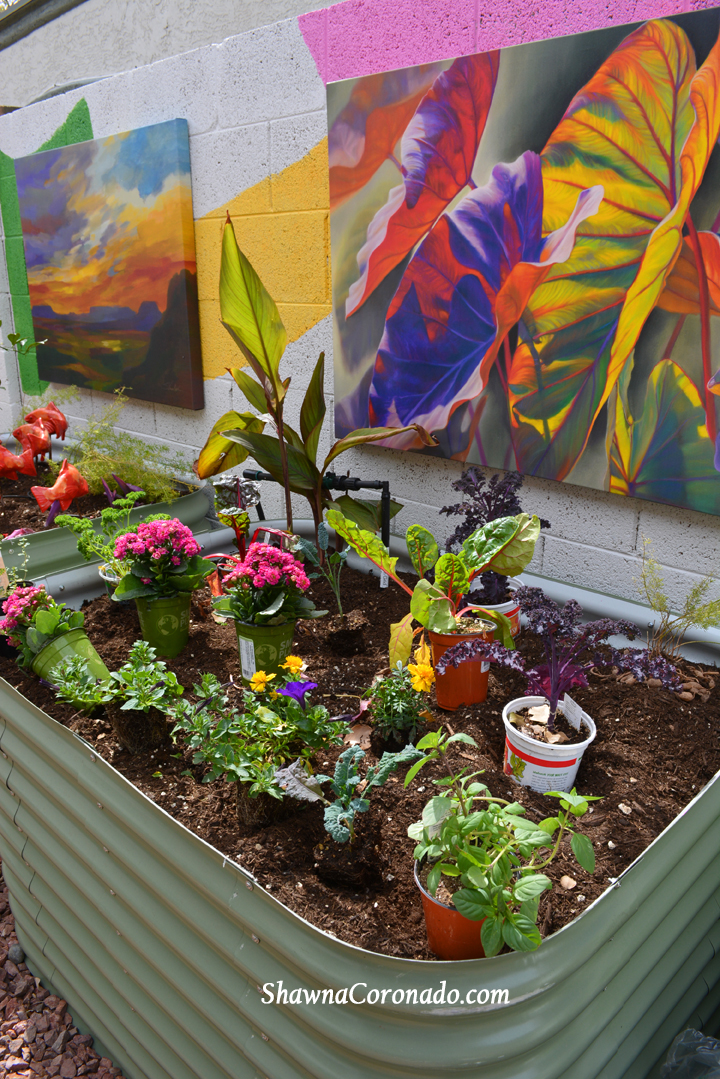
10 – Plant Your Garden
Planting the garden is all based on your preferences. Live in the Southwest like I do? Plant half cactus and half herbs. Live in the far Northern state? Plant perennials and a vegetable garden? It is important to choose plants that will thrive in your region.
Irrigation Lines
Make sure that irrigation lines run to each plant appropriately. I topped each of my gardens with a rock mulch. This is because we have cats that roam the neighborhood and I don’t want the cats to use my beds as a toilet.
11 – Top Garden with a Sculpture Art Display
Top the garden beds with your favorite sculpture art. I have a fishy theme running through all the beds. Seashells and rocks mix with ceramic fish. Your sculpture preference is all about what you want in your garden.
You’ve Got This!
Once the basic art gallery side yard garden is finished you can begin the next level – adding a seating area or connecting the garden to other parts of your outdoor experience. Look for upcoming blog posts on the next level of this fun garden.