How To Make Bowling Ball Bugs For Your Garden
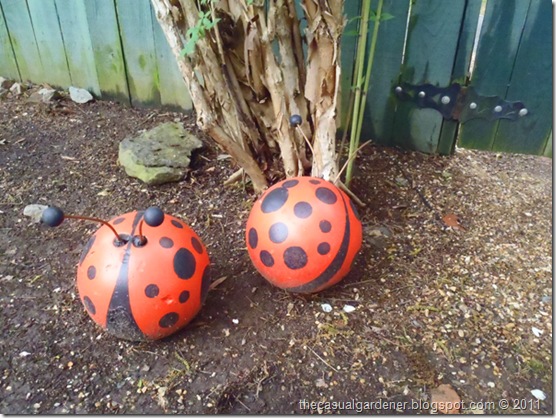
While touring P. Allen Smith’s employee garden during this years amazing Garden2Blog event, I was delighted to see these bowling ball lady bugs in an empty corner. What a creative way to reuse bowling balls. Below you see how to make bowling ball lady bugs.
How To Make Bowling Ball Bugs –
- Bowling ball
- Black silicone caulk
- Paint Brush
- Pencil
- Two 9 inch lengths of #6 wire
- Two 1-inch round wooden beads
- Exterior primer
- Red exterior latex paint
- Black exterior latex paint
- Cover the bowling ball with the exterior primer.
- Paint the bowling ball with several coats of red paint, letting dry between coats.
- Draw the lady bug design on bowling ball with a pencil.
- Fill in the design with black paint.
- Make the antennae by putting caulk inside the bead, then setting the bead on top of a length of wire.
- Place the bowling ball so the bowling ball finger holes face up, then put the caulk in the holes, filling all the way to the top.
- Place the antennae in the two finger holes, propping the antennae if necessary.
- Let everything dry for 24 hours in position.
There you go – how to make bowling ball lady bugs is easy as can be!!
*Note – Because the FTC requires it, I am noting that P. Allen Smith and his amazing team paid for this trip and Garden2Blog experience for all attendees – he flew 20 garden bloggers in to have the experience. We were not told what to document or how to document the experience, we were simply asked to attend – anything expressed in posts related to the Garden2Blog event is my own opinion expressed from my own personal experience.


great .. thank you for this advice
What’s up Dear, are you in fact visiting this weeb site
on a regular basis, if so after that you will definitely obtain fastidious know-how.